Wednesday, April 22, 2009

Virtual Quilt Festival

The task is: find your favorite quilt and post it on the Virtual Quilt Festival, on Park City Girl's blog. Click on this blog title to go see what all the fun is about.

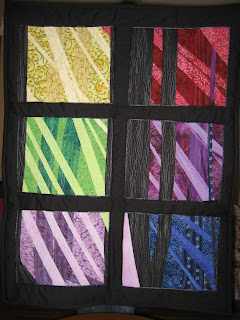
The Wendy Quilt made it to the top of my list, simply because it's pretty, and it launched my quilting skills in so many directions. For the full story of the quilt, click here. Looking back a couple years later, I think this quilt gave me some confidence in my free-motion quilting ability that opened many, many doors. Now that's the part of the quilting process I look forward to most, regardless of the quilt. Working on the quilt also let me flex other creative muscles, and had me addicted to sun-printing. All of this discounts what could be the quilt's most significant attribute: it's purple.

Enjoy, and check out other groovy quilt blogs at the Virtual Quilt Festival.

Sunday, April 19, 2009

Quilting Festival

The International Quilt Festival in Chicago is over, and I'm recuperating. So is my wallet.

I was able to take quite a few classes this time around, and took away quite a bit. The first class was a day-long class from Wendy Butler Berns on a machine applique technique. To get our feet wet, we worked with one of her patterns: Captivating Coneflower.

The fabrics were our own that we brought in and arranged to finish out the design of the piece. I was surprised at how easy this technique really was. I have been living and working in fear of the dreaded applique, but in the end, this isn't that much harder than fusible applique. One of the things that I really liked about it was that there was no flipping of the design; we worked the entire time from the front of the fabric and the design. Edges were turned under, toward the back. This made it pretty easy to see how all the pieces fit together.

I was happy that I finished enough of the design to be able to transport it safely. All that is left to do on the quilt top is to add a dragonfly in the sky above the flower. This will be done with fusible, simply because the details are a little bit finer, making the process of turning seams under bulky and difficult. Then I can run a zig-zag stitch around the edges of each piece, and then it's ready to go.

One of the other classes I took was exceedingly fun. Bonnie Langenfeld taught a class on Saturday on creating a landscape with thread painting. It felt like there was no doing wrong with the stitching; it was so relaxed. It was very freeing, and already I'm addicted to the process and buying more luscious threads. A fiend has been created!

I actually finished the piece in class, too! This was a first for me, and many of my classmates.

Monday, April 6, 2009

Free-Motion Quilting...Loops?

While I was working on the last quilt, I ran into problems with these loops showing up on the back side of the quilt. It seemed if I kept my stitches neat and smallish, the effect would be minimized, but I grew frustrated with their presence, and my inability to eliminate them. What to do?


Last Thursday night, I was flipping through a book by Katie Pasquini Masopust and found a side-bar note about the subject. She suggests threading the needle with the presser foot in the up position, otherwise you'll find these loops on the underside of your quilt. In all the possible things I could think of that I might be doing wrong, this did not occur to me. And to think, I found this solution very much on accident.

So, I have hope that the problem will be resolved with the next quilt.

Friday, April 3, 2009

Baby Quilt Finished, Hurray!

Here it is, in all its glory: the baby quilt that was completed and given away last weekend. I really love how this turned out. The fabrics are all delicious and work perfectly together. And it looks exactly as Electronic Quilt said it would. Thanks to everyone who weighed in on which design I should use.

I was a little sad to see this quilt go!


I used strip-piecing to piece the top of the quilt. This means I sewed two long strips of fabric together, then cut perpendicular to the seam, creating smaller strips of two squares that were sewn together. Two sets of these strips were sewn together to create a 4-patch.

I've included some close-up pictures of the quilt so you can see the free-motion quilting lines. You can also see the fun navy fabric with the wacky flowers and random eyeballs. (Or olives? You decide.)


And here's the payoff at the end: the patch that says "I made this!" Also, check out the flowers on the back side of the quilt!

Sunday, March 15, 2009

Contest Winner!


My quilt, Illuminated Grove, won a prize in the Quilters Treasure Fabric Challenge. As a result, the quilt will be touring with the company and the other prize winners of the competition. It will be on display for all to see. Eventually, I think it will be on the Quilters Treasure Web site.

I am definitely jazzed about all this. I cannot believe I won something with my first contest entry! A lot of times, it seems so easy to doubt yourself, to wonder if you really are good at what you do. When something like this happens, it validates the hard work and taking myself seriously. I will be flying off of this for a while yet.

Thursday, February 19, 2009

Electric Quilt, Decisions

Playing With Design

Thanks to the wonders of EQ software, I have scanned the fabrics for the baby quilt into the computer and uploaded them to the design software.

Bammo! I'm on my way. Now, if I could only choose between the thirty-five permutations of the same design. I think I have it narrowed down to one of two designs:


Help!!! I gravitate toward one, because of my own prejudices toward color. But that doesn't mean it's baby-appropriate. Keep in mind, though, that I'm making a larger quilt so it can stay with the kid longer than just being a baby. I'm so torn!

Tell me what you think!

Wednesday, February 18, 2009

Focus

Here it is: My Achilles Heel.

My eyes are too big for my stomach. Literally and figuratively. For now, let's focus on the figurative.

Outside of my day job, I am a writer. I am a quilter. And I am beginning to see myself as an artist. Right now, all of these are dreams competing for my attention. Since I do have the aforementioned day job, which in a good week takes up 40-50 hours of my time, it doesn't seem like I have enough hours in the day for all my dreams.

So one of them has to take a backseat.

Unfortunately, I think that has to be the quilting.

The dream on the writing front is to revise my novel, get it published, and somehow magically become a full-time writer. My reasoning goes that this is a shorter, more certain road, than making a living off my quilting. But, when the day does come that I set my own schedule, am my own boss, I should have more flexibility for working my quilting into my life in a big way.

Don't get me wrong. I'm not going to stop cold turkey. I'm not even planning to stop, period. I just think that I need to downgrade the quilting to hobby for now, with fewer competition goals, less time set aside for quilting. Rather than spend time on the quilting every day, I am going to start spending time on the writing every day, setting the quilting aside for weekend fun.

In the meantime, I'm setting the artichoke quilt aside for now. Almost. I'm going to try to get to a good stopping place this weekend, then set it aside. I will then turn my attention to the baby quilt, due to a shower at the end of March.

Saturday, January 31, 2009

Ladies and Gentlemen...an Artichoke?


During the design class I took at the Quilting Expo in November, I had occasion to observe another person's source of inspiration, or one of them. The teacher had a file of pictures she had clipped from magazines that she thought might make a good design, either for the subject of a quilt or the design of quilting lines. Since then, I have started my own picture file, for those occasions when I find myself in need of some inspiration.

A new quilting challenge had me going back to this file to find inspiration for a quilt of fruit, veggies, or flowers. I pulled a few pictures of flowers, one or two of some fruit, and this one of an artichoke. I started to play with the picture of the artichoke, tracing its lines and daydreaming about fabric. In so doing, I found myself entranced. At the beginning of this process, I doubted I would find a fruit or vegetable to inspire a quilt. Maybe, maybe, I could find some flowers that wouldn't be trite. But now, here I was, falling in love with the artichoke.

Over the last couple weeks, I've scanned it in, converted it to black and white, and made a template of it. All along the way, the artichoke kept getting prettier and prettier. Let's hope the same can be said of the quilt.

It's a Tough Job...

...but somebody's gotta do it!


Today I went through the agonizing process of going to a quilting store and choosing fabric for some upcoming projects. (Check the store out at www.quiltology.com.) This brutal process involves passing through rows of quilting fabric, looking for fabrics to catch my eye, auditioning them against one another to see if they fit. I have to pull the fabric off the shelf, touch it, look at the pretty colors...

It's agony, but I am willing to suffer for my art.


What projects looming on the horizon inspired such a visit? Well, there's the artichoke quilt that I'm doing for a competition (more on that later), and also the quilt for a dear friend's baby shower. She's due at the end of April with a baby girl, and the shower is at the end of March. So, not a ton of time to finish said quilt, but enough. Enough.


In the end, I decided on some fabrics for the baby quilt to complement the decor of the baby's room now, but have enough variety in the color scheme to accomodate any change in decor. Hopefully this quilt will be something the kid has for a long time.

These fabrics seems whimsical, but not childish. Exactly what I was looking for. I've scanned them in and started playing with them in my EQ software. So far, I'm loving just about every configuration of them. More play...more hard decisions.


'Tis the life of a quilt addict.

Thursday, January 29, 2009

New Projects Abound

Since finishing the Illuminated Grove quilt, I found myself a little out of sorts with the quilting projects. There were no particular projects looming on the horizon. Sure, I had vague notions of finishing another quilt I started in classes in November, or the original quilt I started for the competition. But, there was no real impetus.

Have I mentioned that I work better under a deadline?

So it was that I found myself, at the beginning of this month, dumping out all my scraps to do . . . SOMETHING . . . with. But what?

First, I found that these scraps would need sorting. Some of them were long and thin, and would be ideal for weaving. Some of them were large enough to be pieced into another quilt someday. Perhaps a crazy quilt? And some, oh some were tiny and gorgeous. They couldn't be salvaged as pieces of anything; there wasn't enough room for even a basic seam allowance. These scraps I decided would be great for some fabric collage.

The problem with this process was that, by the time I made it through the sorting, I was exhausted. My lofty ambitions of finding something to do with all of my scraps were dashed. But, over the course of the next week, I assembled some collage sandwiches. Here's the process:


1. Pull out some water-soluble stabilizer. Place a layer a little bigger than the collage you want to make on the table.

2. Place scrappy bits of fabric on top of stabilizer. These bits can include small pieces of fabric, yarn, thread, etc. I like to collect the tangled mess of unraveled fabric that gets cut off quilt fabric when it comes out of the dryer. I suppose you could throw in the dryer lint, too, if that made you happy. Personally, I don't like the look of it. Anyway, arrange these happy scraps in a way that pleases you. I like to add some Angelina fibers to the top for a shiny look, if it seems appropriate.

3. Unless it's the look you're going for, make sure that you don't see any table showing through the middle of your collage to avoid holes in the collage.

4. Cover with another layer of stabilizer and pin the heck out of the sandwich. (You can see some of the pictures of collage sandwiches I have yet to complete.)

5. Go to your sewing machine and free-motion stitch the heck out of the sandwich. You want to keep the stitching very close together and all over; these stitches are what's going to end up holding the collage together.

6. Once you've finished stitching, go to your sink and rinse out the stabilizer. Lay flat to dry.

These are some of the collages I did finish. In the meantime, projects have arisen. More on that later!