Wednesday, April 29, 2009

Quilting Studios, Quilting Corners

A Case of Studio Envy

In my email inbox this morning, I found something from Quilting Arts, pushing their Summer Studios issue. Has it been a year already since I was last taunted with everyone else's abundance of space, reminded of my own inadequacy?

It's not that I begrudge everyone their space. Okay, it is exactly that. I can't help feeling flush with the green of envy when I see pictures of studios, with shelves and shelves of fabric stretching from floor to ceiling. Or the tables devoted to nothing but the sewing machine, or separate tables for nothing but cutting or ironing. It gives me pangs when I see a design wall. That's an entire wall, devoted to nothing but a large piece of felt or batting. I've never known such riches.

My husband and I live in a two-bedroom condo in the city. I don't have a studio, or even a room devoted to my quilting. I have a corner. The corner of our living room is where my quilt love is allowed to flourish. A whole corner. And I have a table that folds up or out from Ikea that serves as my sewing/cutting table and design wall. And also a dining table.

A weekend or two ago, I had the time and inclination to do something about my fabric storage issues. So I set out to reorganize my quilting corner. I reasoned that, if I only had the proper tools of organization, if I just shuffled my materials around a little more, I would have plenty of room for what I have, and room to grow on.

In the end, I made a better space for myself. I took down a shelf that previously held our DVDs and repurposed it for thread and fabric. I pulled an old set of shelves out of retirement for my quilting books, batting, scraps, and miscellaneous project bins. And, I reorganized the drawers inside my cabinet. So, I have a system of organizing fabric that makes sense by size. All in all, I think it looks better and more organized. Is it like the gorgeous studios that line the pages of Quilting Arts? No. But in the end, it's not too shabby.
Sunday, April 26, 2009

Lucy Jane's Quilt

...and so it begins.

I've played with Electronic Quilt, and come up with the final design of the quilt for Charles's cousin's new baby. Here it is, according to the software. I scanned in the fabrics to my computer (love this feature!), so it's a fairly good representation of what the finished product will look like.

So, tonight I will begin the long and tedious task of ironing these fabrics so that the real fun can begin!

Wednesday, April 22, 2009

Virtual Quilt Festival

The task is: find your favorite quilt and post it on the Virtual Quilt Festival, on Park City Girl's blog. Click on this blog title to go see what all the fun is about.

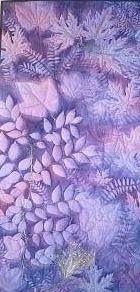
The Wendy Quilt made it to the top of my list, simply because it's pretty, and it launched my quilting skills in so many directions. For the full story of the quilt, click here. Looking back a couple years later, I think this quilt gave me some confidence in my free-motion quilting ability that opened many, many doors. Now that's the part of the quilting process I look forward to most, regardless of the quilt. Working on the quilt also let me flex other creative muscles, and had me addicted to sun-printing. All of this discounts what could be the quilt's most significant attribute: it's purple.

Enjoy, and check out other groovy quilt blogs at the Virtual Quilt Festival.

Sunday, April 19, 2009

Quilting Festival

The International Quilt Festival in Chicago is over, and I'm recuperating. So is my wallet.

I was able to take quite a few classes this time around, and took away quite a bit. The first class was a day-long class from Wendy Butler Berns on a machine applique technique. To get our feet wet, we worked with one of her patterns: Captivating Coneflower.

The fabrics were our own that we brought in and arranged to finish out the design of the piece. I was surprised at how easy this technique really was. I have been living and working in fear of the dreaded applique, but in the end, this isn't that much harder than fusible applique. One of the things that I really liked about it was that there was no flipping of the design; we worked the entire time from the front of the fabric and the design. Edges were turned under, toward the back. This made it pretty easy to see how all the pieces fit together.

I was happy that I finished enough of the design to be able to transport it safely. All that is left to do on the quilt top is to add a dragonfly in the sky above the flower. This will be done with fusible, simply because the details are a little bit finer, making the process of turning seams under bulky and difficult. Then I can run a zig-zag stitch around the edges of each piece, and then it's ready to go.

One of the other classes I took was exceedingly fun. Bonnie Langenfeld taught a class on Saturday on creating a landscape with thread painting. It felt like there was no doing wrong with the stitching; it was so relaxed. It was very freeing, and already I'm addicted to the process and buying more luscious threads. A fiend has been created!

I actually finished the piece in class, too! This was a first for me, and many of my classmates.

Monday, April 6, 2009

Free-Motion Quilting...Loops?

While I was working on the last quilt, I ran into problems with these loops showing up on the back side of the quilt. It seemed if I kept my stitches neat and smallish, the effect would be minimized, but I grew frustrated with their presence, and my inability to eliminate them. What to do?


Last Thursday night, I was flipping through a book by Katie Pasquini Masopust and found a side-bar note about the subject. She suggests threading the needle with the presser foot in the up position, otherwise you'll find these loops on the underside of your quilt. In all the possible things I could think of that I might be doing wrong, this did not occur to me. And to think, I found this solution very much on accident.

So, I have hope that the problem will be resolved with the next quilt.

Friday, April 3, 2009

Baby Quilt Finished, Hurray!

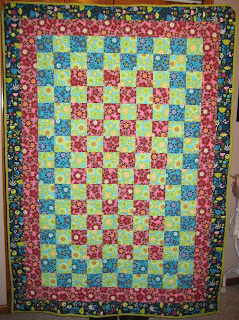
Here it is, in all its glory: the baby quilt that was completed and given away last weekend. I really love how this turned out. The fabrics are all delicious and work perfectly together. And it looks exactly as Electronic Quilt said it would. Thanks to everyone who weighed in on which design I should use.

I was a little sad to see this quilt go!


I used strip-piecing to piece the top of the quilt. This means I sewed two long strips of fabric together, then cut perpendicular to the seam, creating smaller strips of two squares that were sewn together. Two sets of these strips were sewn together to create a 4-patch.

I've included some close-up pictures of the quilt so you can see the free-motion quilting lines. You can also see the fun navy fabric with the wacky flowers and random eyeballs. (Or olives? You decide.)


And here's the payoff at the end: the patch that says "I made this!" Also, check out the flowers on the back side of the quilt!